
how to create restore point windows 11 is one of those things you only search after an update, driver install, or app change makes your PC feel “off”, and you want a quick way back without wiping everything.
The good news, Windows 11 already includes System Restore, and creating restore points is usually fast once System Protection is enabled. The bad news, many PCs ship with it turned off, or configured so it barely saves anything.
This guide walks through when restore points help, how to create one manually, how to make Windows create them more reliably, and what to do if the option is missing or errors out.
What a restore point does (and what it does not)
A restore point is a snapshot Windows saves so you can roll back system files, registry settings, drivers, and some installed apps to an earlier state. It’s designed for “something changed and now Windows acts weird” moments.
What it usually does not do: recover personal files like photos or documents you deleted. For that, you want File History, OneDrive versioning, or a real backup.
According to Microsoft Support, System Restore is intended to help recover from problems caused by recent changes, and it does not affect personal files in most cases. That “most cases” matters: app installs and driver changes can behave differently across devices.
Common situations where System Restore helps
- New driver causes crashes, black screen, or unstable Wi‑Fi
- Windows update creates boot issues or performance drops
- Security software or a utility tool changes system behavior
- Registry or system setting tweak backfires
When you should not rely on restore points
- You need to recover deleted files (use backups instead)
- Your disk is failing (restore points can disappear or fail)
- The PC is infected with advanced malware (get professional help)
Quick checklist: should you create one now?
If you’re about to do any of the following, it’s smart to create a restore point first. It takes a minute and can save an hour.
- Installing a GPU, chipset, audio, printer, or network driver
- Running an “optimizer,” registry tool, debloater, or tweaking script
- Upgrading Windows, joining Insider builds, or major feature updates
- Changing security settings, virtualization features, or boot options
Rule of thumb: if the change touches Windows itself (not just your files), make the restore point.
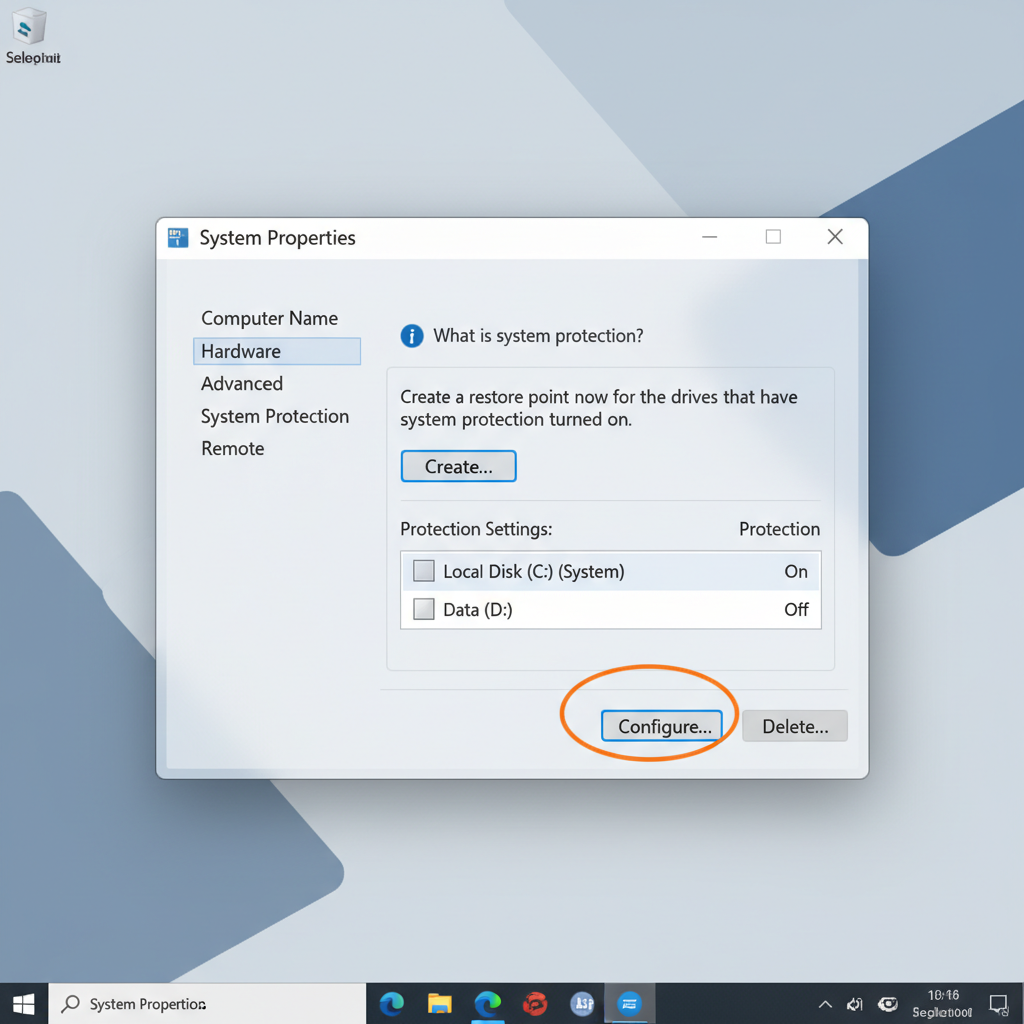
Enable System Protection first (many PCs skip this)
If “Create…” is grayed out or restore points never appear, System Protection may be off for your system drive. This is the step people miss when they search how to create restore point windows 11.
Turn on System Protection
- Press Windows key, type Create a restore point, open it.
- In System Properties > System Protection, select your System drive (usually C:).
- Click Configure… > choose Turn on system protection.
- Set Max Usage (disk space). Many people pick 3%–10% depending on disk size.
- Click Apply, then OK.
Disk space matters because Windows deletes older restore points when it hits the limit. If you set it too low, you’ll think “Windows never saved anything,” when it’s actually rotating them out quickly.
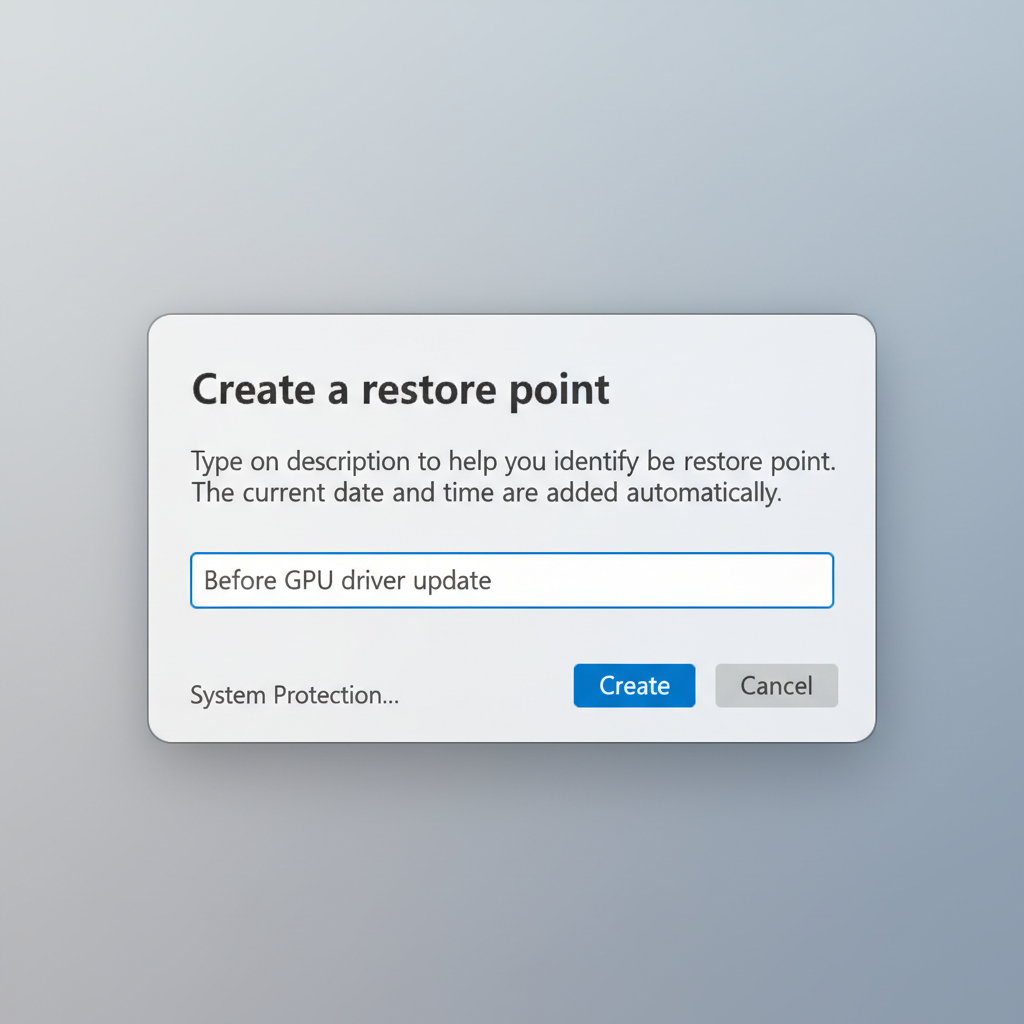
How to create a restore point on Windows 11 (manual method)
Once System Protection is enabled, you can create restore points on demand in a predictable way, which is often the safest approach.
Steps
- Open Create a restore point from Start search.
- On the System Protection tab, confirm your system drive shows Protection: On.
- Click Create…
- Give it a clear name like Before printer driver install or Pre-Windows Update.
- Click Create and wait for the confirmation.
Tip that sounds basic but helps: use names that describe the risk you’re about to take, not the date. When you’re troubleshooting later, you’ll thank yourself.
Automate restore points (so you do not have to remember)
Windows sometimes creates restore points automatically around updates, but behavior can vary by system configuration. If you prefer something more consistent, scheduling is a practical workaround.
Option A: Use Task Scheduler (built-in)
This method typically works well for personal PCs. You can create a scheduled task that triggers a restore point daily or weekly.
- Open Task Scheduler.
- Click Create Task… (not “Basic Task,” you’ll want more control).
- General tab: name it, check Run with highest privileges.
- Triggers tab: set your schedule (weekly is enough for many people).
- Actions tab: choose Start a program.
- Program/script: powershell
- Add arguments (one line): -ExecutionPolicy Bypass -Command "Checkpoint-Computer -Description 'Scheduled Restore Point' -RestorePointType 'MODIFY_SETTINGS'"
- Save the task, then right-click it and run once to confirm it works.
If you see errors about System Restore being disabled, go back and confirm protection is on for C:. Also keep in mind Windows may limit how frequently restore points can be created within a short window.
Option B: Create one before risky actions (lightweight habit)
- Before any driver update: create a point manually.
- Before cleanup tools: create a point manually.
- Before BIOS/firmware utilities that run inside Windows: create a point, and also consider a full backup.
Restore points vs backups: what to use, when (quick table)
People mix these up. A restore point is a rollback tool, not a complete safety net.
| Tool | Best for | Usually includes personal files? | Typical downside |
|---|---|---|---|
| System Restore (restore point) | Undo drivers, updates, system changes | No | Can fail if disk space low or system corruption exists |
| File History / cloud versioning | Recover documents, photos, edits | Yes | Needs setup and storage |
| System image backup | Full-machine recovery after major failure | Yes | Takes time and lots of space |
| Reset this PC | Last resort when Windows is broken | Maybe (depends on option) | Can remove apps/settings, takes longer |
If something goes wrong: how to use a restore point
Creating points is only half the story. You also want to know how to roll back quickly when Windows still boots, and what to do when it does not.
Restore from inside Windows
- Search Create a restore point > open it.
- Click System Restore…
- Choose a restore point, click Scan for affected programs to preview changes.
- Confirm and start. Your PC restarts during the process.
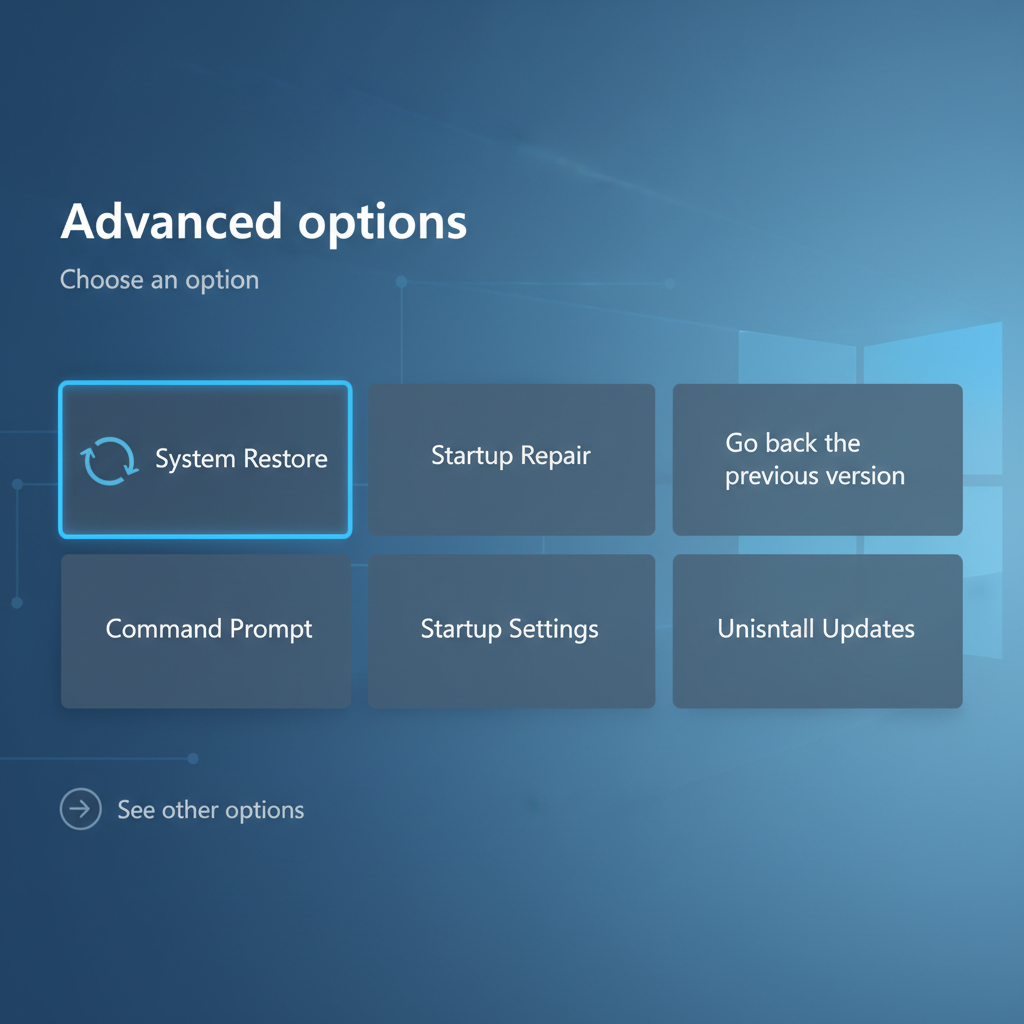
Restore when Windows will not boot
- Enter Windows Recovery Environment: Settings > System > Recovery > Advanced startup > Restart now, or use a recovery drive.
- Select Troubleshoot > Advanced options > System Restore.
- Pick the restore point and follow prompts.
According to Microsoft Support, System Restore can be run from the Windows Recovery Environment when Windows cannot start normally, which is exactly why having restore points ahead of time matters.
Troubleshooting: when “Create restore point” is missing or fails
If you followed the steps and still cannot create one, don’t keep clicking the button hoping it changes its mind. These are the common blockers.
Fast fixes that often work
- Protection is Off: Enable it for the system drive and set disk usage above a tiny value.
- Not enough disk space: Increase Max Usage or free space on C:.
- System files corrupted: Run Command Prompt as admin and try sfc /scannow, then reboot.
- Service issues: Check that Volume Shadow Copy service is not disabled in Services.
Policy or organization-managed devices
If this is a work or school device, System Restore might be disabled by policy. In that case, you may need to ask IT rather than forcing changes that violate admin rules.
Key takeaways (save this part)
- Enable System Protection on C: first, otherwise restore points won’t stick.
- Make a restore point before drivers, big updates, or system tweak tools.
- Restore points help with system changes, not deleted personal files.
- If reliability matters, schedule restore points via Task Scheduler.
Conclusion: a small habit that saves big headaches
If you were searching how to create restore point windows 11, the practical answer is simple: turn on System Protection, create a clearly named point before risky changes, and keep enough disk space so Windows can keep a few snapshots around.
Action you can take today: create one restore point right now, then schedule a weekly one, and you’ll be in a much calmer place the next time a driver or update misbehaves.
FAQ
- How do I create a restore point on Windows 11 without admin rights?
In many cases you can’t. Creating restore points and changing protection settings typically require administrator privileges, especially on managed devices. - How much disk space should I allocate for restore points?
It depends on your drive size and how often you install updates and apps. Many home users choose a few percent of the system drive, then adjust if restore points disappear too quickly. - Does System Restore remove my personal files?
Usually it does not affect personal files, but it can change installed programs, drivers, and system settings. If you’re worried about important files, back them up separately. - Why can’t I click “Create” in System Protection?
Most often protection is off for the system drive, or your organization disabled it via policy. Low disk space can also cause odd behavior. - How often does Windows 11 create restore points automatically?
Windows may create them around certain updates or installs, but it’s not guaranteed across all systems. If you want consistency, scheduling is more predictable. - Can I create a restore point from Command Prompt or PowerShell?
Yes, PowerShell can create one using Checkpoint-Computer, but it still depends on System Protection being enabled and Windows allowing a new restore point at that time. - What should I do if System Restore fails during the process?
Try a different restore point, check disk space, and consider running SFC to repair system files. If failures continue, you may need deeper troubleshooting or help from a qualified technician.
If you’re trying to make restore points more reliable because you frequently test drivers, troubleshoot updates, or manage multiple PCs, a simple routine helps: weekly scheduled restore points plus a separate file backup plan, so you’re covered even when System Restore can’t do the whole job.